
Does anyone have a heater fan resistor pack/unit thingy, I've got bored with trying to work out what's wrong with mine!
We've checked and cleaned it and although it appears to be in reasonable condition, it just will not work. The fan works fine when run direct off the battery, but as soon as you try to run the fan off the battery through any of the resistor connections it won't work. Continuity tests show that the resistors and the safety cut-out contact are ok, but the meter shows no voltage at the fan as soon as it connected up. Seems to stop working as soon as there's any load? Weird! It looks such as simple peice of kit I can't understand what could be stopping it working!
Anyway, a new or second-hand one would be most welcome! The one in there at the moment is the 'caged' variety.
Heater fan resistor pack
Heater fan resistor pack
Is that supposed to happen???? 
Re: Heater fan resistor pack
Checking continuity isn't going to cut it, try shorting the cutout. Otherwise look for a joint that most of the voltage is dropping across.
1980 345 DL_______1987 360 GLE (project car restored to GLT spec and B230FT'd)
1984 360 GLT______1987 360 GLT
1983 360 GLS______1989 360 GLE
1985 340 GL_______1986 340 1.4
1985 360 GLS______1995 940 SE 2.3 Turbo Estate (daily)
1987 340 GL 1.7
1984 360 GLT______1987 360 GLT
1983 360 GLS______1989 360 GLE
1985 340 GL_______1986 340 1.4
1985 360 GLS______1995 940 SE 2.3 Turbo Estate (daily)
1987 340 GL 1.7
-
macplaxton
- Posts: 3283
- Joined: 09 Feb 2008 02:29 am
Re: Heater fan resistor pack
Right, there are three part numbers from memory of the resistors. One of them is only for cars with aircon.
Anyway, there are four terminals on a regular one:

DSCF4810a.JPG by macplaxton, on Flickr
As you can see, someone has bodged this by bypassing the thermal cut-out with a piece of wire joining terminals O and R. It works, but then there is nothing to stop it from going into meltdown if anything goes wrong.
If you have this:

DSCF4852a.JPG by macplaxton, on Flickr
Then the bimetallic contact has gone AWOL.
It should look something like this if it is complete:
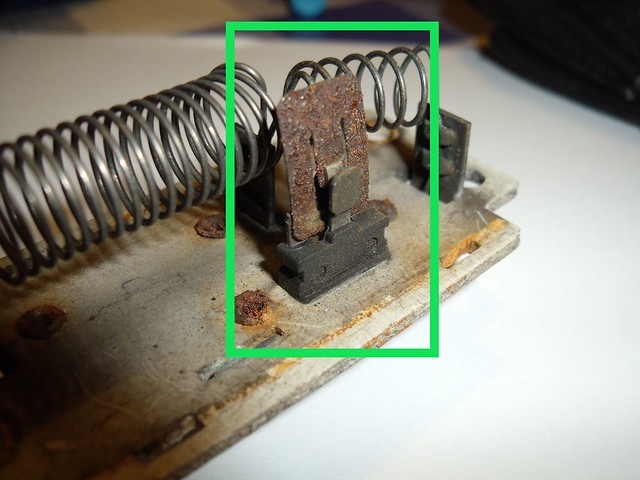
DSCF5677a.JPG by macplaxton, on Flickr
Although you may find that you can drive a bus through the gap.

DSCF5675a.JPG by macplaxton, on Flickr
The trick is to clean the two contact point up and with great care, bend the bimetallic piece back towards the fixed contact so that they touch. If you are lucky, it won't break off as in the first example and will work. If your bimetallic strip has gone AWOL, then it's probably better to substitute it with a thermal fuse rather than straight piece of wire, but some thought would have to go into how you fix it in place as soldering it can toast the fuse unless you can shunt enough heat away from the fuse whilst soldering.
Replacement TCO units have been looked into. Two stumbling blocks are the exact specification and rating of the TCO and a £250 minimum order...
Hope this helps.
Anyway, there are four terminals on a regular one:
DSCF4810a.JPG by macplaxton, on Flickr
As you can see, someone has bodged this by bypassing the thermal cut-out with a piece of wire joining terminals O and R. It works, but then there is nothing to stop it from going into meltdown if anything goes wrong.
If you have this:
DSCF4852a.JPG by macplaxton, on Flickr
Then the bimetallic contact has gone AWOL.
It should look something like this if it is complete:
DSCF5677a.JPG by macplaxton, on Flickr
Although you may find that you can drive a bus through the gap.
DSCF5675a.JPG by macplaxton, on Flickr
The trick is to clean the two contact point up and with great care, bend the bimetallic piece back towards the fixed contact so that they touch. If you are lucky, it won't break off as in the first example and will work. If your bimetallic strip has gone AWOL, then it's probably better to substitute it with a thermal fuse rather than straight piece of wire, but some thought would have to go into how you fix it in place as soldering it can toast the fuse unless you can shunt enough heat away from the fuse whilst soldering.
Replacement TCO units have been looked into. Two stumbling blocks are the exact specification and rating of the TCO and a £250 minimum order...
Hope this helps.
72 DAF 44 Estate 78 Volvo 343DL Black Beauty

82 Volvo 343DL CVT
 88 Volvo 340DL Diesel
82 Volvo 343DL CVT
88 Volvo 340DL DieselRe: Heater fan resistor pack
Thanks for the info, we'll give it another go at the weekend. The bimetallic strip is still there and I've cleaned up the contacts and made sure the touch, but still no joy ... grrrr...
Is that supposed to happen????
-
macplaxton
- Posts: 3283
- Joined: 09 Feb 2008 02:29 am
Re: Heater fan resistor pack
The other thing to do is make sure the legs of TCO are in contact with the two terminals riveted to the board.
The legs of the TCO go through the board and are then bent over at 90 degrees. Then over the top of them are riveted the two spade terminals. Slightly lift away the edges of the terminals that are securing the TCO, clean terminals with abrasive, then push the edges back down and make sure they are secure by soldering.
The legs of the TCO go through the board and are then bent over at 90 degrees. Then over the top of them are riveted the two spade terminals. Slightly lift away the edges of the terminals that are securing the TCO, clean terminals with abrasive, then push the edges back down and make sure they are secure by soldering.
72 DAF 44 Estate 78 Volvo 343DL Black Beauty
82 Volvo 343DL CVT 88 Volvo 340DL Diesel
82 Volvo 343DL CVT
88 Volvo 340DL Diesel